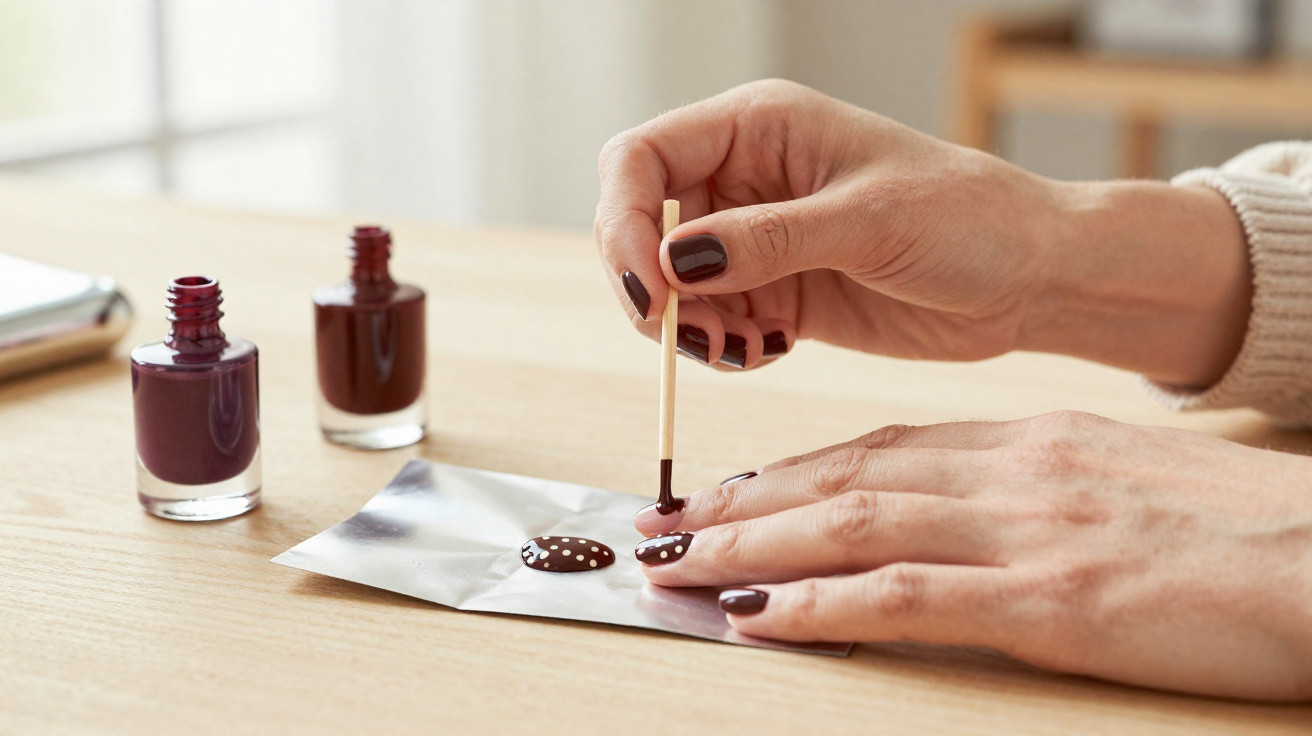
A fresh autumn manicure can feel like one more thing to fit into a busy week - and salon nail art is not always in the budget. Polka dots are an easy at-home option: with a wooden toothpick, two polishes and a little patience, you can create a design that looks deliberate without needing perfectly steady hands.
The key is simple: use very little polish, let each layer dry properly and keep the pattern loose. A chocolate-and-cream combination feels suitably autumnal, but dots work just as well with sheer nudes, burgundy, plum, forest green or metallic accents.
Why polka dots suit autumn manicures
Polka dots sit neatly between playful and polished. They can look graphic in black and cream, softly retro in burgundy and blush, or more seasonal in deep brown, rust, dark green and navy.
They are also more forgiving than designs requiring crisp lines or exact symmetry. The dots do not have to be identical. Slightly varied placement and size can look intentional, provided there is enough space between them.
Try one of these colour pairings:
- Cream dots on a dark chocolate base
- Black dots over sheer nude or milky pink polish
- Burgundy dots on warm beige
- Gold dots over deep green, navy or oxblood
- Two or three tonal shades from the same colour family
- A clear or nude base with tiny brown, red and orange dots
The easiest nail art to wear is usually the simplest: two colours, a little space between the details and no pressure to make every nail match.
What you need before you start
You need very little for the basic look. The pointed end of a toothpick makes tiny dots, while its broader end can create a slightly larger mark.
Gather the following:
- A base coat, if you normally use one
- One base colour and one contrasting polish for the dots
- A clean wooden toothpick or smooth cocktail stick
- A small piece of foil, ceramic saucer or clean plastic lid
- Nail polish remover and a small brush or cotton bud for tidy-up work
- A top coat
- Optional: a nail-art brush or proper dotting tool
Pour a few drops of the dot colour onto foil or a lid rather than dipping repeatedly into the bottle. This gives you more control and reduces the chance of depositing a large blob on the nail.
Check that a cocktail stick has no splinters. It should touch the nail lightly only; do not use it to push at cuticles or to pick at the skin around the nail.
Prep makes the finished design look neater
The dots are quick, but preparation helps the manicure look tidier and last better. Start with clean, dry nails and remove any old polish thoroughly. File the free edge gently into your preferred shape.
If you usually care for your cuticles, keep it gentle. There is no need to cut them, and avoid working on sore, damaged or irritated skin. Short squoval nails work particularly well with scattered dots, although the design suits any length.
Apply a thin base coat, followed by one or two thin coats of your chosen base colour. Let the colour dry properly before adding dots. If the base is still soft, the toothpick can leave dents or drag polish into streaks.
For ordinary nail polish, it is best to wait until the surface no longer feels tacky. If you are short of time, choose an accent nail design rather than trying to decorate every finger at once.
The toothpick method, step by step
1. Make a small polish palette
Place a few drops of your dot colour onto foil or a lid. Close the bottle between uses so the polish does not thicken unnecessarily.
2. Load the toothpick lightly
Dip only the tip into the polish. You want a tiny bead rather than a drip. If it looks too large, touch the toothpick onto a spare corner of foil before moving to your nail.
3. Touch, then lift straight away
Bring the toothpick directly down onto the nail and lift it back up without dragging sideways. This creates a rounder dot. Your first mark may be a little bigger, so place it where a bolder detail will look intentional, such as near the tip or side of the nail.
4. Build the pattern gradually
Start with three or four dots, then decide whether the nail needs more. For an all-over pattern, work in loose rows. For something subtler, place dots along one edge, near the tip or in a small cluster.
Leave the base colour visible between the dots. Crowding the pattern is the quickest way to make it look muddled.
5. Vary the size deliberately
Use the very tip for pinprick dots. Turn the toothpick slightly, or use its thicker end, for larger ones. A mix of two sizes can look especially effective over a sheer base.
6. Add top coat with a light hand
Give the dots time to dry before sealing them. Apply top coat in light, floating strokes rather than pressing the brush firmly into the design, as this can smear the colour.
Easy designs if you do not want every nail covered
A full polka-dot manicure is cheerful, but a few details can feel more understated for work, weekends or an occasion.
The dotted tip
Apply your base shade, then add a row of dots along the tip. Keep them evenly spaced for a neater finish, or vary their size for a confetti effect. Deep brown dots over a sheer pink base are a simple autumn choice.
The cuticle curve
Place a small half-moon of tiny dots following the curve at the base of the nail, leaving a narrow gap from the skin. Gold, silver or cream can work well here, depending on the base colour.
The accent nail
Paint most nails in one solid shade and use dots on just the ring finger or thumb. This is ideal if you are practising, and it makes a small imperfection less noticeable.
Coordinated mismatched dots
Use the same two colours across both hands but change the placement from nail to nail: scattered dots on one, a side detail on another and a small cluster on the next. Repeating the colours keeps the result cohesive.
If you are new to nail art, start with one accent nail. You can always add more once you have seen how the colours look together.
Common mistakes that make dots look less polished
The most common problem is using too much polish. Large, raised blobs can take longer to dry and may catch on hair or clothing. Use less than you think you need, then add another dot only if necessary.
Other mistakes to avoid include:
- Dotting over a base colour that is still soft
- Using old, stringy polish that will not form clean circles
- Putting the dots too close together
- Applying a thick top coat before the dots have dried
- Trying to correct every mark while the polish is wet
- Leaving polish on the surrounding skin until it has fully hardened
If one dot goes wrong, let it dry before deciding what to do. You may be able to balance it with a second dot nearby, turn it into a small cluster or remove the polish from that one nail and start again.
Keep the manicure comfortable and safe
Use polish and remover in a well-ventilated room, particularly if you are sensitive to strong smells. Keep bottles away from heat, flames and children, and wash your hands after finishing.
Do not apply nail products to broken skin, irritated cuticles or nails that appear infected or unusually damaged. Stop using a product if it causes stinging, redness, swelling or a rash. If symptoms are severe, spreading or do not settle, seek advice from a pharmacist or healthcare professional.
Use products intended for nails only. Avoid household paint, permanent marker, loose craft glitter or glue, which can be difficult to remove and may irritate the skin.
Help it last through autumn weather
Cold weather, frequent handwashing and household cleaning can make polish lose its shine sooner. Once the top coat has dried fully, apply hand cream around the nails and wear gloves for washing-up, gardening and cleaning.
You can refresh the finish with a thin top coat after a few days, provided the manicure is still smooth and intact. When removing it, hold a remover-soaked cotton pad on each nail briefly, then wipe gently. Avoid scraping or peeling polish away, as this can leave the nail surface feeling rough.
The appeal of toothpick polka dots is that they do not need to be perfect. Pick two colours you genuinely like, begin with a single accent nail and keep the pattern simple. It is an inexpensive way to give an everyday manicure an autumn update without booking a salon appointment.










Comments
No comments yet. Be the first to comment!
Leave a Comment