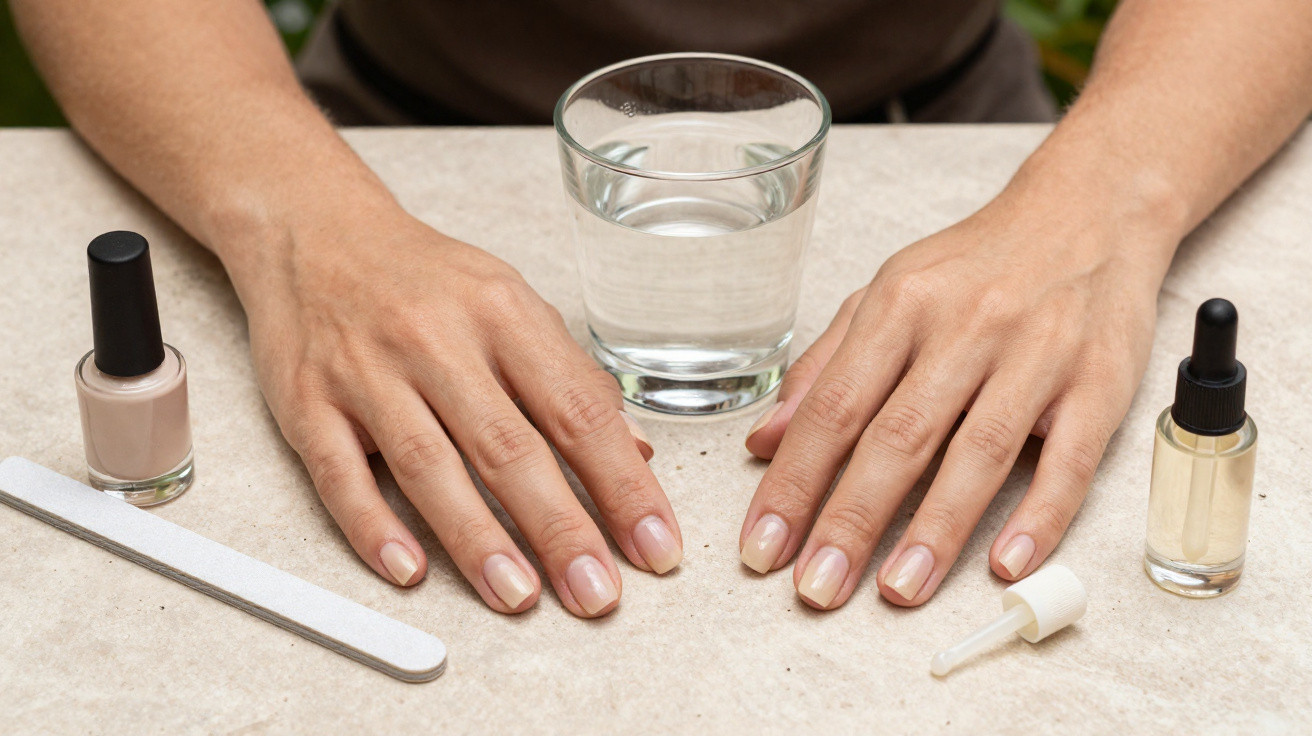
A nude manicure can be harder to pull off than a bright colour. If it is too opaque, it can look chalky; if it is too sheer, every dry cuticle, ridge and uneven edge is on show. The appeal of ‘coconut water’ nails is their balance: a translucent, creamy wash of colour topped with a glossy finish.
The look associated with Anne Hathaway is not a solid white manicure. Think of the faint cloudiness of coconut water in a glass: light can still pass through it, but it has a soft creamy cast. The trick is thoughtful preparation, very thin coats and shine - not layering on pale polish.
The aim is not to hide the natural nail completely, but to make it look smoother, fresher and more light-reflective.
What are ‘coconut water’ nails?
‘Coconut water nails’ is an informal beauty name for a sheer neutral manicure with a creamy undertone and a high-shine finish. There is no single prescribed shade. The effect can be created with translucent ivory, pale beige, pink-beige or vanilla-toned polish, depending on what works with your natural nail colour and skin tone.
The main features are:
- a semi-transparent finish, with some of the natural nail still visible
- a creamy rather than stark-white undertone
- a glossy, glass-like surface
- neat cuticles and softly shaped tips
- short to medium-length nails in a rounded, squoval or soft almond shape
It is a useful option when you want nails to look tidy and polished without a bold colour. It can also be a practical choice for occasions where you would rather not worry about obvious chips.
Coconut water nails versus milk nails
The names are similar, but the finishes are different. Milk nails are usually more opaque, creating a cloudy white or pale-pink veil. Coconut water nails should appear lighter and more transparent, with warmth rather than a noticeable white layer.
Look at the free edge of the nail to judge the result. With this style, it should remain softly visible through the polish. If the free edge has disappeared entirely and the colour looks dense, you are closer to a milk manicure.
Choose this look if a clear coat feels too bare, but conventional nude varnish looks too beige, pink or heavy on your hands. A sheer creamy tint is more forgiving because your own nail tone remains part of the final colour.
Prepare the nail without overdoing it
Sheer polish cannot disguise rough edges or very dry skin as effectively as a dark or opaque shade. Preparation matters, but it should be gentle: aggressive filing, buffing and cuticle cutting can do more harm than good.
1. Shape the nails gently
Use a fine nail file and work in one direction. Short rounded nails are especially effective here, as the compact shape suits the understated finish. A squoval shape - straight-ish across the top with softened corners - is an easy everyday option.
Avoid filing heavily at the sidewalls, and keep the lengths broadly even rather than trying to achieve perfect symmetry.
2. Tidy the cuticle area
After a shower or hand wash, gently push back softened cuticles with a suitable manicure tool or wooden orange stick. Remove only loose dead skin if needed.
Do not cut living cuticle tissue or pull at hangnails. This can cause soreness and increase the risk of irritation or infection. If the skin around your nails is swollen, broken or painful, leave the manicure until it has settled and seek advice from a pharmacist or healthcare professional if necessary.
3. Smooth sparingly
If you have obvious ridges, use a very fine buffer with the lightest pressure. Over-buffing can thin the nail plate, so it should not be a standard step every time you paint your nails.
Remove dust and surface oil with nail polish remover or a lint-free pad lightly dampened with isopropyl alcohol, following the product directions. Let nails dry fully before applying polish.
Choose a sheer neutral that suits your hands
The shade matters more than the trend name. Coconut water nails should look luminous and creamy, never like correction fluid. Check a possible shade in daylight if you can: warm indoor lighting can make pale varnish look much whiter than it does outside.
Useful shade descriptions include:
- sheer ivory
- warm porcelain
- translucent vanilla
- pale almond
- creamy beige
- soft blush nude
- neutral jelly pink
A transparent pink-beige or porcelain shade may suit those who find yellow-toned nudes unflattering. Warm almond, peach-beige and honeyed tints can work well on medium and olive complexions. For deeper skin tones, a sheer caramel, rosy beige or warm neutral may give a more natural-looking glow than a very pale polish.
Test one nail first if you are unsure. The best shade enhances your natural nail tone rather than making it look grey, yellow or completely erased.
Start with less colour than you think you need. This manicure is meant to be buildable, not opaque.
How to recreate the look at home
Regular nail varnish is the simplest low-commitment way to try the look. Set aside enough time for each layer to dry: sheer polish is easily dragged or dented when rushed.
1. Apply a thin base coat
Use one thin layer of clear base coat. A ridge-filling formula can help if your nails have texture, but choose one that is clear or only lightly tinted so the result does not become too opaque.
2. Paint one fine coat of colour
Apply a translucent creamy shade with three controlled strokes: one down the centre and one on each side. Leave a tiny gap around the cuticle and sidewalls rather than flooding the skin.
The first coat may look almost too subtle. That is normal: the transparency is what distinguishes the style from a standard cream manicure.
3. Assess before adding a second coat
Once the first layer is dry, add a second thin coat if it improves the evenness. Stop when the nail still looks softly visible beneath the colour. Some very sheer jelly formulas may need a third coat, but too many layers can make the finish look thick and conventional.
If you spot a streak, avoid repeatedly brushing over it. Let the layer dry and even it out with the next thin coat instead.
4. Finish with gloss
A glossy top coat creates the watery effect. Sweep a small amount across the free edge of each nail to help protect the tips from everyday wear.
Although regular polish may feel dry on the surface, it can still dent for several hours. Try to avoid washing-up, rummaging in a handbag or handling keys straight after painting.
If you prefer salon gel or builder gel
For a salon appointment, show your nail technician a reference image of a translucent creamy finish and say clearly that you do not want opaque white nails. A sheer gel colour over a structured base can create an even result, particularly where nails have visible texture.
Builder gel is often used to add strength or structure, but the right approach depends on your nails and the salon’s product system. Do not peel lifting gel away yourself, as this can remove layers from the natural nail.
Take extra care with at-home gel products. Uncured gel on the skin can lead to irritation and sensitisation. Use only products and lamps intended to work together, follow the stated curing times, avoid skin contact and stop using the product if you develop redness, itching, swelling or blistering. Seek medical advice for a suspected allergic reaction.
Keep the shine looking fresh
A minimalist manicure makes dryness more noticeable, especially after swimming, frequent handwashing or cleaning. In the UK, cold weather, central heating and wet days can be equally hard on hands.
To extend the polished look:
- massage cuticle oil into the nail folds once or twice a day
- apply hand cream after washing your hands
- wear gloves for washing-up, cleaning and gardening
- avoid using nails to open cans or scrape labels
- add a fresh top coat after a few days if you are wearing regular polish
- arrange gel maintenance before lifting becomes tempting to pick
For a quick refresh, lightly file a rough edge, use cuticle oil and apply a clear glossy top coat. Often, that is enough to make the manicure look cared for again.
Common mistakes that make the look less refined
The strength of coconut water nails is their restraint. These mistakes can quickly change the effect:
- Using a bright opaque white: this produces a milkier manicure rather than a translucent finish.
- Applying thick coats: polish can pool near the cuticle, take longer to dry and look uneven.
- Skipping nail preparation: pale sheer shades make ragged edges and dry cuticles more noticeable.
- Choosing the wrong undertone: a shade that is too grey, yellow or pink can look flat against the skin.
- Over-buffing: trying to erase every ridge can weaken nails over time.
- Picking at lifting gel: this may cause peeling and thinning of the natural nail.
- Forgetting gloves for household jobs: detergents and prolonged water exposure can dull the shine and dry the surrounding skin.
If you clean your manicure tools or worktops while doing your nails, use cleaning products as directed and ensure good ventilation. Never mix bleach with vinegar, acids, ammonia or other cleaners, as dangerous fumes can be produced.
A simple neutral manicure to save
Coconut water nails work because they make natural nails look like the feature rather than something to conceal. Keep the shape soft, choose a sheer creamy tint that complements your hands and prioritise the glossy top coat.
Two thin layers, tidy cuticles and a little patience are usually enough. Resist the urge to add more and more polish: the hint of transparency is exactly what gives this manicure its fresh, refined finish.








Comments
No comments yet. Be the first to comment!
Leave a Comment